Tuesday, December 16, 2014

You can bake these crescent rolls!

Does your mouth water at the smell of yeast and the sight of soft dough rising in the bowl? Maybe just the thought makes your mouth water?

This is the often requested recipe for my dinner rolls. Maybe you'll make some for your next family feast?


As you can see, this card has been out and used frequently. I use butter instead of margarine, and my KitchenAid mixer for the muscle part. I premix the yeast, one tablespoon of sugar, and 1/2 cup of warm water. Then begin blending the rest of the ingredients...butter, 1/2 cup sugar, eggs, salt, milk, the pre-mixed yeast and the first three cups of flour. My sweet sister lovingly reminded me that Mom always scalded and then cooled the milk to room temperature. Bringing the eggs and milk to room temperature will guarantee the success of your yeast!
Set the timer and let the mixer beat this up for three full minutes. Then mix in flour one cup at at time; mixing for a full minute after each cup is added. By the fifth cup, I switch to the dough hook. I always use 6 cups of flour. Letting the mixer do the kneading feels a bit like cheating from when I used to make this under my mom's eye, but oh so easy these days! 

At this point, you can cover the bowl and place it in the refrigerator to rise up.  This is so helpful, because you can mix this the night before or early in the day you want fresh rolls for dinner.  

Or you can continue the process by placing the bowl in a warm spot to double - at least an hour. 

After the dough has risen,  punch it down, divide the dough in half, and roll into a circle about 16" across. Cover with softened butter.
Cut into wedges. I use a pizza cutter and make 16 rolls from each half of the dough.
Place rolls on a baking sheet and let these rise about 30 minutes. 
Preheat your oven to 375. (Mom used to bake hers at 400, but I burn my rolls that way!) Bake for 10 to 12 minutes. Then coat with more butter when you take them from the oven.

Following Mom's recipe, I've never had a failure. The only way to ruin this would be to not have good yeast. That's why I always pre-mix the yeast, water and sugar first to make sure it's working. When you see it is bubbly, you know it's good yeast.

I've made these upon request lots of times, I can ship them too, for a price! Maybe you'll try this recipe? Let me know how it works for you!
Happy Thanksgiving!

Tuesday, December 2, 2014

BUTTERMILK COOKIES

Are you craving a delightful treat for the holidays?  This recipe is one of our family favorites.


Buttermilk cookies
These cookies may become your family favorites too! This recipe makes a ton of cookies, and they are so light and fluffy.
Easy recipe - just allow time for the dough to chill and for baking several batches.  
Good cooks know to set out all the ingredients before you begin to mix so you make sure you have everything you will need.  I use Crisco shortening in this recipe because it always seems to work best. I've tried other brands and the cookies just don't turn out well. I also keep Saco powdered buttermilk on hand because I just don't use up a quart of buttermilk at a time and this recipe only calls for 2 cups.  

Use your mixer to cream the shortening and sugar.  Add the eggs and vanilla and mix well. Add the other ingredients mixing well. After the cookie dough has chilled for an hour, preheat the oven to 350. Drop the dough by rounded teaspoons onto the cookie sheet.   Bake just until they have a tinge of golden brown.  Remove from the cookie sheet and allow them to cool completely before frosting with a simple powdered sugar icing.  

If you have any left over cookies after the first day,  keep these cookies stored in the refrigerator between layers of wax paper.  

If you need any help baking these yummy cookies, let me know! Or if you ask really nice, I'd even bake and mail some to you if you are reluctant to bake them yourself!

Enjoy!

Wednesday, November 12, 2014

CINNAMON CARAMEL APPLES

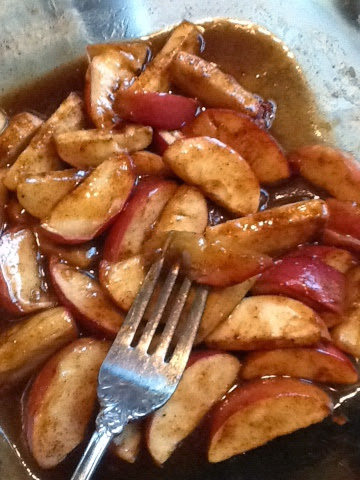
I had the pleasure of using my kitchen to taste test this recipe for baked apples. My house was filled with the mouth-watering smell of apples and cinnamon. It was so easy and delicious, I had to test this recipe again...and again! 
Bake apples  at 350 degrees for 20-45 minutes depending on the type and quantity of apples. 
The more apples you have packed in the dish, the longer it takes to bake.
This recipe is oh, so easy! The ingredients can be adjusted to feed a crowd of 50 or to make just enough for one or two to enjoy. 
Shiny, clean Gala apples.
Choose your favorite apple!

My superman used an apple corer slicer to make quick work!

Wash, core and slice 2 apples.
Toss the apples with the following mixture:
1 teaspoon cornstarch 
1/4 cup brown sugar
1/2 teaspoon cinnamon
1/4 teaspoon nutmeg 
Melt 2 tablespoons of butter in a baking dish. Add the coated apples and bake at 350 degrees for 20-30 minutes (or until the apples are tender). Stir to cover the apples with that yummy cinnamon caramel sauce that will be in the bottom of the pan and serve! 

We used one stick of butter in a 9 X 13 casserole dish and 10 apples.
Tossed apples in the brown sugar and cinnamon coating.
We used a gallon-size plastic bag to mix four apples at a time to make sure the apples were evenly coated.
Left over apples should be stored in the refrigerator. This makes a delicious side dish whether it is served hot or cold. But on a day like today, you'll want to serve this warm from the oven!


Wednesday, October 22, 2014

CRAVING CASSEROLE

Do these cooler, rainy days make you want to prepare something warm and filling for supper? Obviously, that’s what I’m thinking!  This is a favorite go-to recipe.  My mother-in-law Kathy Schroeder who also happened to be one of the nicest people to come into my life, gave this recipe to me! I am ever so grateful she was part of the package when I married Joel.  Ok, back to this recipe!

My old, abused recipe.
It is quick and easy. It can be made as a skillet dinner or put it in a casserole dish to microwave or bake.  Which ever way you prefer, it will turn out delicious!

Since this is a hand-me-down recipe, there are not exact measurements.  You can use a cup or two of leftover ham or cube a ham steak. You can gauge how much ham and macaroni your family will eat in a meal and adjust your ingredients accordingly.

Boil macaroni according to package directions, drain and set aside.

Saute onion, bell pepper and ham 

Sauté onion and pepper in a tablespoon or two of butter.  Stir in chopped ham and heat thoroughly.  Mix in cream of mushroom soup, milk, a tablespoon of corn starch and  the Velveeta.  I usually cube about 1/3 to 1/2 pound of cheese (not 1/3 of the whole block). Stir until the cheese is melted. Add drained macaroni and stir. At this point, it is a skillet dinner and once all the ingredients are heated thoroughly it can be served.  If you prefer, you can transfer everything to a casserole dish and melt the cheese by placing the dish in the oven  for about 30 minutes or however long it takes your family to gathered around the table.  This casserole is a delicious make and take dish.

Ready for supper!
To round out the meal, we enjoy green beans, crunchy carrots, and garlic toast on the side. 
I'd love to hear from you if you try any recipes you find on my blog.  
Enjoy! Let me know what you think of this delicious casserole.


Tuesday, September 30, 2014

TIME WARP

To attend a reunion or not?  Why do we go? Just to have fun and to reconnect!


Southwest High School
I spent a great deal of time with some of these people; my formative years through elementary school, junior high and then through high school.  I learned who I wanted to be and who I did not want to be. I learned a lot about myself while I was being educated through the school system. I had fun with my friends back then and I have had fun with the reunion committee these days.

I'm not the person I was as a child and teen. But, I'm also not the person I'm going to be as I get much older. However, it has been interesting to see who I have become so I would love to see who my classmates have become too.


Back then, I was so shy; I had zero self-confidence. That has changed a little.  Sometimes I have confidence, but I am still quite shy in a large group or until I get to know you.

The reunion committee members have talked about the regrets we have in the way we dealt with a classmate. I would like to think that I was a friend and not a tormentor. I know in my elementary school years I wasn’t as kind as I should have been. Lesson learned.

In school, I had my first crush and my first heartbreak. I learned who I could trust, who I wanted to hang with and who wanted to hang with me. I experimented with a few things, which would be a big surprise to some people today. I had so many questions when I graduated. I still do not have the answers. 


I look at my yearbook and some of the things my friends wrote. Oh, my!  What some people wrote in my yearbook! Was I actually there? I forgot I used to work in the office at school. How could I forget that? I forgot faces that went with the names and the names with faces until I looked at the yearbook. 

Fun, wet, field trip. Sue didn't think it was so fun, did she?
Where are you Sue Hill Plaxco?
Some foggy memories of fun times I shared with some of my classmates are coming back into view. Little flickers come to mind. I hope that I can share some happy memories with my classmates when we get together at the Southwest High School class of 1974 reunion!
Here's the link for all the details. If you haven't signed up to attend, it's not too late!

http://sw74reunion.com


Saturday, July 26, 2014

IT'S THAT TIME OF YEAR!

We can hardly wait for the first tomatoes and peppers to ripen so we can make salsa! A couple of my friends have requested this recipe, so that must mean it is that time of year NOW!

Dayna and I made salsa today and it is so delicious with a little smokey kick!


We followed the recipe exactly, except she wanted smoked tomato salsa. So we experimented by adding 3 ½ tablespoons of liquid smoke because today was not conducive to staying outside smoking tomatoes and then making salsa. 

We always follow the recipe EXACTLY - NOT!
Using the food processor makes our chopping chore easy.
First onions, then jalapenos to make our eyes water!

 
"Are you finished with those jalapenos yet?"
If you want to make some, here is the original post with the recipe for my salsa

Enjoy!

Wednesday, May 21, 2014

SCOTCH CHOCOLATE CAKE

Most people love chocolate and I am one of those people! This cake is a treat that has been handed down to me from my dear, sweet mother-in-law Kathy Schroeder. She taught me so many good things through her loving example. She was one of those do-as-I-do people that I was blessed to know and love! 

Back to the cake...Joel requested that I take this to the cousin family reunion we recently attended.  So if you would like to try this recipe, here it is!

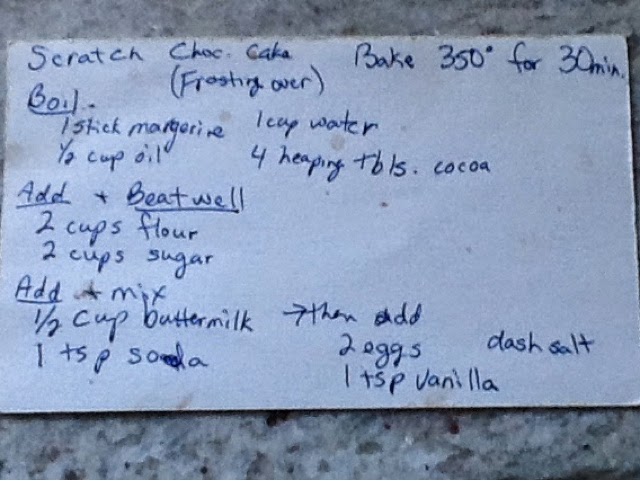
The well-loved and often-used original recipe card.

I measure out all my ingredients and then mix them in the order listed above. You'll notice I use Saco powdered buttermilk. I keep it on hand in the refrigerator for baking all kinds of things. (Did you read my blog about buttermilk cookies?)

Measure out the ingredients you will need.
Bring the first ingredients to a boil over medium heat.

Place the first four ingredients in a saucepan over medium heat. Stir and bring to a boil. Remove from heat and add the flour and sugar. I use my small electric mixer at this stage. Stir in the buttermilk and soda, then add the salt, eggs, and vanilla and beat well. Pour into a greased and sugared baking pan. Yes, I said sugared! When I bake cakes and sweet breads I always dust the pans with sugar instead of flour. Guess I have a sweet tooth! 
Grease and sugar the baking pan. Yes, this is the original Ware-Ever No. 918 baking pan I was blessed to inherit.

Bake for 30 minutes at 350 degrees. A toothpick inserted in the middle should come out clean.  My pan is 15x11, but you can bake this in a 9x13 pan. Check for doneness as it will probably take a bit longer to bake in a smaller pan. Remove from oven and then prepare this frosting:

Place the margarine, cocoa and milk in a saucepan and bring to a boil over medium heat. Remove from heat and stir in vanilla and then the powdered sugar. Mix until no lumps of sugar remain. Pour this mixture over the warm cake. Let it all cool and and then ENJOY sharing with your family and friends!

By the way, I will bake for you on request...if you ask nicely!

Tuesday, April 29, 2014

TORNADO POOP

If  my brain is traumatized by viewing the miles of devastation left behind by the tornadoes, those who are in the midst of it must be reeling! Imagining what it will take to clean up that tornado destroyed scene, leaves me dumbfounded by the enormity of the task. 

Praying for for those recovering from this disaster and the families and friends who have lost their loved ones. Possessions can be replaced, people cannot.  All that debris represents peoples lives. Their belongings have been chopped, shredded, mixed with dirt and spit out as a miles of #tornadopoop.

And this is just the beginning of tornado season!


Friday, April 25, 2014

BANANA BREAD

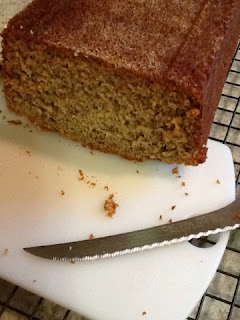
Banana Bread
This smell fills the house and makes my mouth water! Don't you just love to smell fresh-baked anything? Guess who woke up and said, "Something smells good!" And the commercial says the best part of waking up is coffee. Really?

This is my tried and true, handed-down-from-my-mom recipe for banana bread. 
As you can see I've made a few notes over the years to make sure I get consistent results. 


The baking times vary depending on the size of loaf pans I use. 

I use the single loaf size if we aren't planning to share a loaf.


You may notice this inverted loaf is gently coated in sugar. Instead of greasing and flouring a loaf pan, try grease and then lightly sugar it instead. I do this when I bake cakes too. You'll note this came out of the pan smoothly.

These two are a nice size to use when I want to make one and then take a fresh-baked loaf to a neighbor (sorry I didn't do that this morning Dayna)!
These Pampered Chef loaf pans are what I use when making mini loaves for bake sales or special little gifts for the holidays.

Here's the easy part:

Preheat the oven to 350.
Measure carefully and stir together the dry ingredients in a mixing bowl.
In the blender put the eggs, ripe bananas, sugar, and lastly the butter.  
(I cut the butter into 4 chunks.  It seems to blend easier that way.)
Pour the banana mixture over the dry and mix them together.
Pour into the prepared pan or pans and bake!
My large loaf took 50 minutes today because the bananas were a bit large.  So always test your loaf with a toothpick to make sure it's thoroughly baked. The toothpick should come out clean when inserted in the middle.
Invert the loaf pan onto a cooling rack and let that melted sugar soak into the bread for about 5 minutes.

Slice and enjoy! 

I make this bread often and keep it on hand for JoPapa's breakfasts.  I haven't tried shipping this, but if you ask me nicely, I might be convinced to send or bring one to you...for the right price of course.
:-)
Or, you might try baking it yourself so your house will smell as yummy as mine!  Your family will love it too!


Saturday, April 5, 2014

FRUITY MUFFINS

These have to be healthy! They are filled with so much yummy goodness! Even though the original recipe says not to freeze them, I always do.  They are delicious once they are re-warmed.


The original recipe also calls for margarine, but I've switched to using butter. Have you noticed how weird margarine is these days? Recipes don't turn out the way I expect when I cook using margarine for some reason. Can you say "hydrogenated"? If you have read any of my posts you know I ALWAYS follow recipes exactly. Not! Tweaking a recipe is a sign of my creativity!


Let me know what you think of these sweet, healthy muffins when you make them! Or...for the right price, I can bake a dozen and send (or deliver) them to you! Enjoy!

Thursday, March 20, 2014

MEAT-FREE FRIDAY

How surprising to discover that tofu is just as delicious as any meat I've prepared. It doesn't feel like much of a sacrifice to eat tofu instead of meat.

First find tofu. You may have to ask your grocer because it was well hidden at our local store. But we found it in the produce section.  I cubed it, soaked it in a brine of hot water and salt, then drained and pressed it gently between paper towels.


Toss the dried cubes in a mixture of:
1/4 cup cornstarch
1/2  teaspoon onion powder
1/2  teaspoon garlic powder
1/4  teaspoon ginger
1/4  teaspoon powdered mustard

Heat oven to 400 degrees and preheat a 9x13 oven safe pan with approximately 2 tablespoons of oil distributed over the bottom of the pan. Carefully place tofu cubes in the preheated pan.  Bake for 15 minutes, turn the tofu cubes over and bake 15 more minutes or until golden brown. 


The cubes were tasty and crunchy. I served them with a pan of fresh stir fried vegetables over rice with a dressing of Kikoman sweet and sour sauce. 


Thanks to the tutelage of my son Joel jr., I feel confident to prepare tofu. If I can do it, so can you!
It was a very tasty, meat free dinner!

Monday, February 24, 2014

SOFT AND PRETTY KNIT PULLOVER

Cozy textured pullover
Lion Brand Homespun Thick & Quick
This yarn is so soft and pretty! 
Pattern #L32012

Stitch by stitch and row by row the yarn becomes a thing! It amazes me even as my needles click and my projects grow right before my eyes. A bonus with this pattern, and Dayna's confidence in me, I learned how to cable!

Knitting provides an opportunity for contemplation and meditation or gives me an excuse to listen to an audio book or watch TV. Making something I can give away allows me to share a bit of my heart with the receiver. If the recipient wants to pass along my creation, that just spreads the joy into wider circles!

The thing I find so frustrating in anything I make (baking or knitting or canning, etc.)  is to have spent hours in the creation only to have the project turn out less than perfect.  The part I dread, but what I know has to happen in knitting, is rip it out and fix it! That should be OK, since I'm knitting for fun and not to be paid for the completed project. 

I've found several tweaks I want to make in this beautiful-to-look-at sweater. I bound it off too tightly, slightly inhibiting the stretch that should be present in the sleeves. The arms are a bit snug... But the body is nice and long since I followed one reviewer's suggestion so that part turned out just the way I'd hoped. Another reviewer of this pattern suggested a larger ribbing pattern which I also incorporated in this version.
  
Maybe I'll just hang it up and admire it instead of wearing it? Or maybe a miracle will occur and it will fit after all? Crossing my fingers...and it fit!

Any knitters who would like to offer suggestions, I'll gladly accept. Also, if you are interested in any of my creations, let me know!

By the way, I bake on request too!

Friday, January 17, 2014

KEEPING WARM?

How are you keeping warm this winter? A cozy fire in the fireplace is always a lovely option. But how to get that fire started? You knew I would give you a helpful tip for that! Make your own fire starters using dryer lint. I clean out the dryer filter and stash it in a cardboard egg carton until it's full.
Next, I carefully melt some old candles.
I use an old soup can inside a pan of water to slowly melt old pieces of candles. Hot pads or even pliers to handle that hot can of melted wax are essential! You'll want to cover your workspace with newspaper in case you drip wax.  Drizzle plenty of melted wax over each lint egg and let it cool. 
Then all you do is peel off a section, place one under your stack of wood, and light the corner. This little lint candle will burn and start the logs every time!
Of course, you'll want to have the makings for s'mores on hand so you can toast yourself and a marshmallow at the same time!

Now don't you feel warmer?

Thursday, January 2, 2014

Applying Less Is More To My Life

My friend Jennifer shared this New Year's Resolution with me and it got me to thinking...

JoPapa and I decided to downsize and purge our possessions. Getting rid of a lot of our things was a painful process.  There were a lot of sentimental attachments to things we had accumulated.  The smaller house is good, there's less to clean! So I learned if I have less stuff it equals more freedom.

Here in no particular order, are some other things I'm going to try to apply the "less = more" philosophy to in 2014:

Complain less  = more gratitude 
Waste time less = more accomplished 
Worry less = more peaceful attitude  
Wish less = more doing 
Reminisce  less = more memories made
Take less = more giving
Critique less = more praise
Desire less = more generosity
Worry less = more positive attitude
Faith-falter less =  more Bible study
Wish less = more doing
Take things for granted less = more appreciation 
Waste less = more conserving
Talk less = more listening 

This list is one place where MORE might be a good thing. I'm open to your suggestions for applying less = more! What are your thoughts?